Django Ninja JWT Trial
Introduction
I had heard of JWT long ago but had never actually used it. Recently, while researching the tus resumable upload protocol, I got into the hooks-http level, with the goal of authenticating during file uploads. Naturally, I thought of the django-ninja-jwt package. I thought it should be simple, but after reading the Chinese documentation, I found that it was not just simple — it was bare-bones to an astonishing degree.
Getting Started
According to the guide, you only need to install dango-ninja-jwt and django-ninja-extra, then replace NinjaAPI with njaExtraAPI, and it takes just one line.
api.register_controllers(NinjaJWTDefaultController)
It is honestly baffling.
Hold on — let's take a look at the docs first. Three new endpoints show up: pair, refresh, and verify.
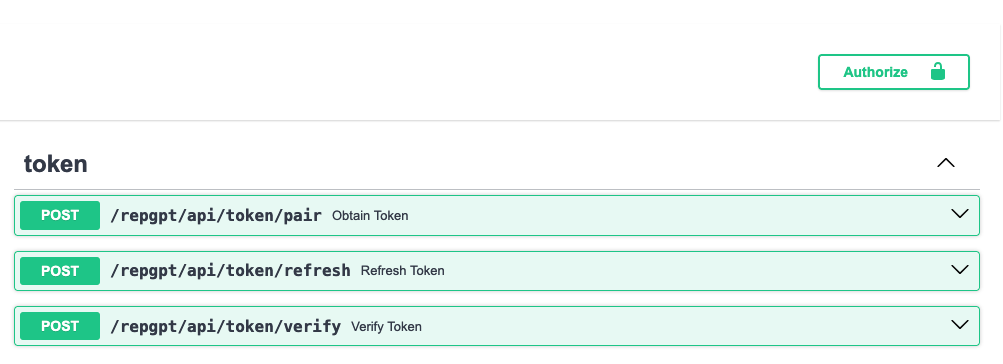 Note the lock icon in the upper right corner — it will come in handy later. It only appears when you use the
 JWTAuth function.
pair
The first one is the pair endpoint. It means that after you provide a username and password, it returns authentication tokens and refresh tokens.
The request body format is as follows:
{
  "password": "string",
  "username": "string"
}
username appears below, which is a bit different from what you might assume.
After clicking Execute, you will get something like this:
{
  "data": {
    "username": "lyq",
    "refresh": "eyJhbGciOiJIUzI1NiIsInR5cCI6IkpXVCJ9.eyJ0b2tlbl90eXBlIjoicmVmcmVzaCIsImV4cCI6MTc0MzE0NzU2NCwiaWF0IjoxNzQyNTQyNzY0LCJqdGkiOiI4MTZmMzg2YWYwNmY0NmVhOWY1YzlkMDJjYzQxZjFkOCIsInVzZXJfaWQiOjF9.G-mTefGtP-cTXWVrxAsqXGGKnZ1442jw67ilvTY5gcQ",
    "access": "eyJhbGciOiJIUzI1NiIsInR5cCI6IkpXVCJ9.eyJ0b2tlbl90eXBlIjoiYWNjZXNzIiwiZXhwIjoxNzQyNjI5MTY0LCJpYXQiOjE3NDI1NDI3NjQsImp0aSI6IjdiMGY1Y2Y5NTVlZDRiMzQ5M2M3MmY4NzJmNDdkMzUxIiwidXNlcl9pZCI6MX0.JO9PxVA-rX6TPo9Db00eOuOorThjgX3nTjBT-CuOh90"
  }
}
refresh
The access token above can be used for authentication, but it has a limited lifetime by default. The refresh token has a longer lifetime than access, and is used to obtain a new access token after the previous one expires.
Once refreshed, the previous access token is invalidated.
At this point, you can copy access into the lock icon in the upper right corner. This way, every endpoint on the current page can use it, which is convenient for debugging.
verify
You can go to the third endpoint, verify, to check whether the access token is valid.
So overall, django-ninja-jwt simply builds three endpoints for you, making it convenient to obtain, refresh, and test tokens.
Customization
These three endpoints alone are not enough — at the very least, we need to add authentication to our own specific endpoints.
What you need here is JWTAuth; only after using it will the lock icon appear.
from ninja_jwt.authentication import JWTAuth
@route.get('/some', auth=JWTAuth())
def some_endpoint(request):
    """Convenient for showing the auth button on the docs page"""
    return request.auth.username
some endpoint, there is also a standalone lock icon.
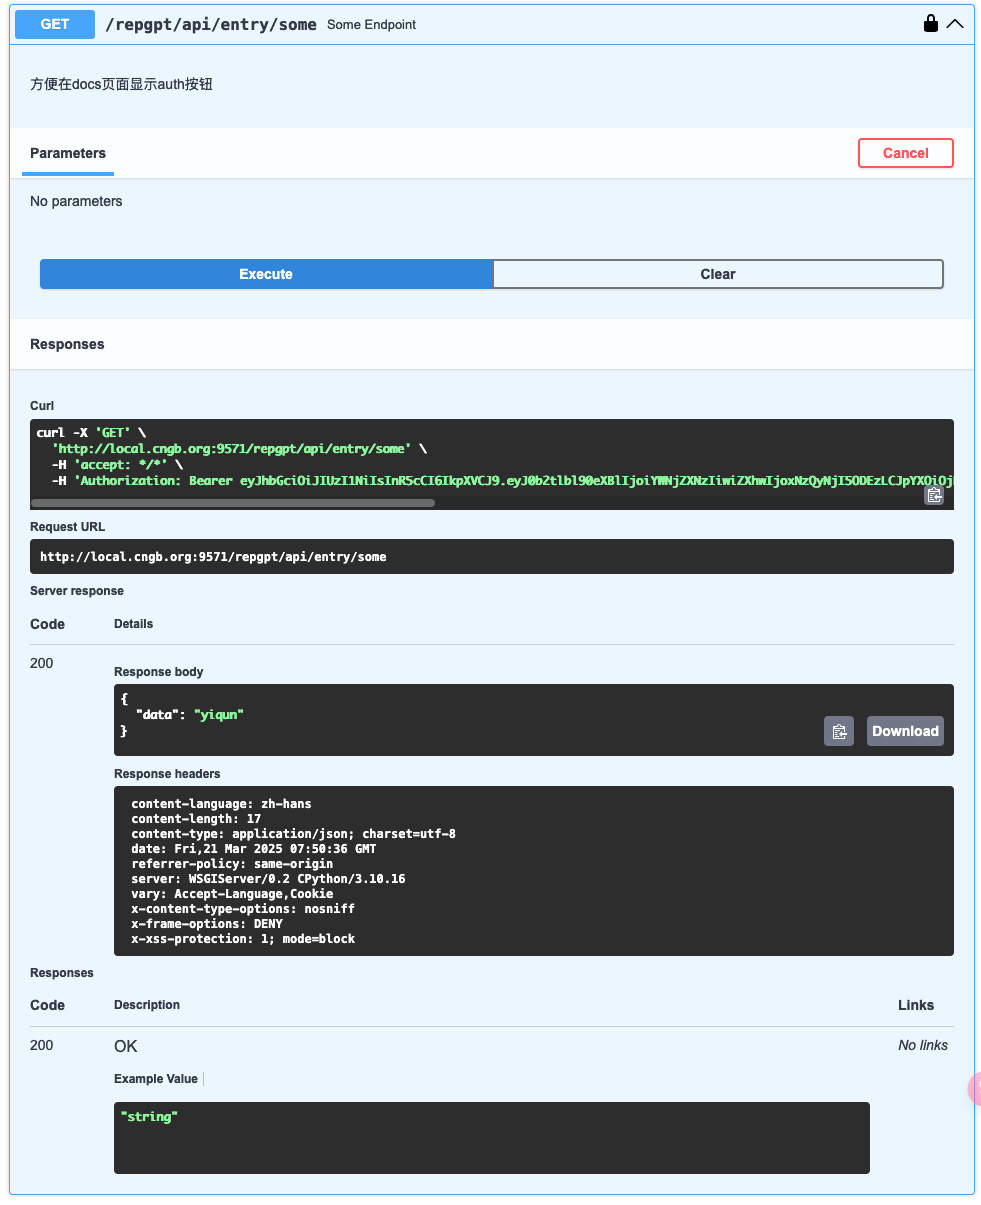 For the
 some endpoint above, if authentication succeeds, it responds with the username of the currently logged-in user. If it fails, it returns a 401 response.
Backend developers need to tell the frontend team to send this value along — let them go to the pair section to obtain it, and periodically go to refresh to refresh it.
Configure the Token Lifetime
from datetime import timedelta

SIMPLE_JWT = {
    'ACCESS_TOKEN_LIFETIME': timedelta(days=1),  # Access token lifetime
    'REFRESH_TOKEN_LIFETIME': timedelta(days=7),  # Refresh token lifetime
    'AUTH_HEADER_TYPES': ('Bearer',),
}
Further Customization
If using @route.get('/some', auth=JWTAuth()) in your ninja route does not meet your needs, you can call authenticate inside the function.
@route.get('/some')
def some_endpoint(request):
    auth = JWTAuth()
    # If it fails, a 401 is raised internally
    if auth.authenticate(request, token):
        return request.auth.username
token above needs to be extracted from the request object yourself.
Comments
本文总阅读量次